Calibration
The app must be calibrated before guiding to meet two objectives:
- The app should have a clear and stabile view on the guide star using the back camera.
- The app should have learned the telescope axes, i.e., it should know how to control the telescope, to bring the star back to position.
Calibration is started from the main menu using the same-named button. It encompasses four steps.
Step 1: Camera
At first camera parameters are set, such that the app sees a clear and stable guide star.
Click on „Auto detect” first to start an automatic detection of parameters. After that, conduct fine tuning:
- Make the star as sharp as possible using Focus.
- Using ISO you can brighten up the image. However, increasing the ISO value also increase image noise.
- With Exposure you set how long a single frame is exposed. A longer exposure allows for a brighter guide star but also diminishes the number of frames that are processed per second.
- Using Zoom you can enlarge the image section. This is a lossless crop zoom, i.e., the image is not scaled up but pixels are removed at sensor boundaries when zooming in. Usually, this value should be set to 100%.
tl;dr: Focus as sharp as possible, ISO and exposure as high as required (not higher), zoom to 100%.
Step 2: Threshold
At the second step, the threshold for detecting stars is set. This value denotes at which brightness a pixel is considered as part of a (guide) star.
Set this value in a way that the guide star is as round as possible.
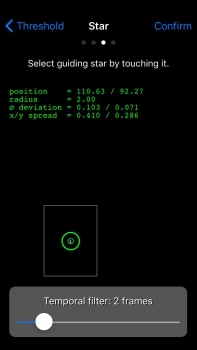
Step 3: Guide star
At step 3, you choose a guide star by touching it on the display. If only one star is available, it is selected automatically.
After choosing the star, statistics are displayed. The average deviation denotes how much the guide star moves between two camera frames on average. The spread denotes the movement of the star within one second. These values are provided as x and y coordinate and are good indicators for tracking noise. You cannot guide more precise than these values, i.e., the threshold, at which the app starts actuating your telescope, should be higher than the average deviation.
You can also enable a temporal filter in this step. Once updated, the position of the star is averaged over an arbitary number of frames in order to smooth noise peaks effectively. However, this filter also makes tracking more inert and potentially less precise.
Step 4: Axes
After the first three steps, you should see a stable guide star on screen. In the last step, the app learns the alignment of telescope to ensure an optimal guiding. You start calibration by pushing the button in the center of the view. How calibration works depends on your selected kind of guiding.
Manual guiding
If manual guiding is chosen, the app displays instructions which keys you have to push on your hand controller for calibration. Follow the instructions on screen.
Automatic guiding
If automatic guiding is chosen, the app will connect with your telescope to move it into all four axes while tracking the guide star. Do not touch the telescope during this process.
Result
The result of this process are crosshairs that show all four actuation directions for the telescope. If an error occurs, a message is shown containing advise how to fix the problem.
